An unconventional engineering student with business background

Quadcopter
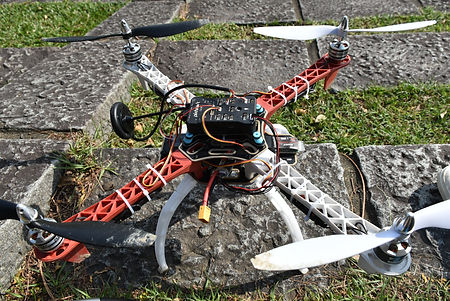
Built in 2017 fall, the first year in my engineering study, the quadcopter "Donut" was equipped with PID control for stabilization and a GPS module for long range cruising and route planning. It could also be controlled with an RC controller.


Figuring out how to fly
At first, I had no idea how a quadcopter could work. Referencing books, tutorials, and online materials, the goal of launching my own quadcopter into the sky still seemed pretty unlikely, even after assembling all the parts.
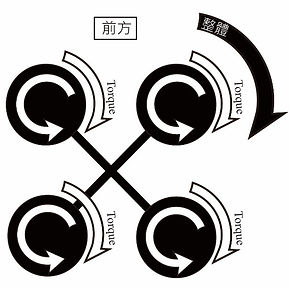
I noticed that the quadcopter only spins at the spot without flying off from the ground. Drawing out the directions of each of the propellers, I realized that I set all four of the propellers to turn in the same direction, resulting in an overall reactant torque that destabilizes the quadcopter.

Varying the direction of the motor, paired with the propeller of the correct hand, would cancel out the reactance torque. My initial setup looks like the one on the right. This setup, despite having a balanced torque when flying straight, may run into problems when turning.
To turn the quadcopter, one side has to have a larger motor output than the other. However, such a setup would once again result in unbalanced reactant torque that causes the quadcopter to spin midair.

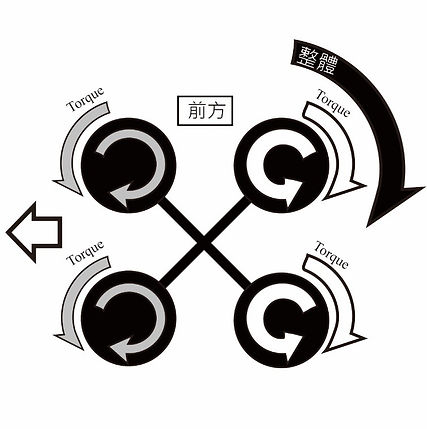
The best configuration, therefore, should look like the figure on the right side: the diagonal propellers are of the same hand while the neighboring ones are the opposite ones. This ensures a stable flying and turning maneuver.

Control & Modules
PID control is implemented to stabilize the quadcopter with Pixhawk flight controller. A GPS module is mounted to provide details about the location of the quadcopter. An RC remote controller is used to dictate the movement of the quadcopter, which has an RC receiver on board. I was just beginning my engineering study when building this quadcopter, and therefore this was the first time that I learn anything about control. The quadcopter was stabilized with PID control, and I was able to tweak the parameters based on the motions I observed from the quadcopter. Overshoot, undershoot, and settling time, terms unbeknownst to me at first introduced themselves as the necessary building blocks to a safe flying drone.
Building Montage
The whole build was constructed with individual effort. Prior to this, I had no experience in engineering practice. I recorded some of the building processes, which were initially intended to be edited into a tutorial for constructing a quadcopter. However, in the end, I acknowledged how superficial my knowledge of drones was, and decided to wait for the day that I could proclaim myself as the expert on drones to release a proper tutorial.
Learn From Failures
This was the first time I engaged in anything related to being a maker or an engineer. One major lesson that I learned from this experience was that failure is the shortcut to success. Numerous failures, from wrong wire connections, not being able to launch it, dropping the drone midair, to hurting myself due to the turning blades, all taught me a lesson in how to become a better engineer. The most frustrating moments, in hindsight, were also the prelude to the most exciting breakthroughs, and this is why I love science and engineering.